

What if the wet spot in your vehicle isn’t where the water entered? Finding a leak in a windshield seal means tracing the water’s path, not assuming it came through the glass directly above the damp carpet or trim. Moisture can travel before it becomes visible.
It’s reasonable to wonder whether the windshield seal is the cause, especially when dampness keeps returning. A basic water test can help narrow down a likely entry point, but it can’t confirm the source in every case. Forcing trim, scraping sealant, or applying a product before identifying the problem can make diagnosis harder.
This guide explains how to look for likely leak paths and check them safely with a controlled water test. You’ll also learn what the test can and can’t show, and which signs call for a professional glass inspection. A technician can distinguish a seal-related concern from other windshield damage and determine whether repair or replacement is appropriate.
Key Takeaways
- Finding a leak in a windshield seal starts with noting where moisture appears, including near the headliner, A-pillar trim, dashboard corners, or windshield-side carpeting.
- Water can travel before it drips, so the damp spot may not line up with the entry point.
- Use a helper and gentle, gradual water flow to check small sections. Avoid pressure washing and electrical areas.
- Moisture near the roof, cowl, or door can point to other possible leak paths, so treat symptoms as clues rather than proof.
- Document recurring moisture and limit further water exposure. A glass assessment can help determine the appropriate next step.
Finding a Leak in a Windshield Seal: Start With the Clues
A windshield-seal leak means water is getting in around the perimeter where the glass meets the vehicle body. It’s different from a crack or chip in the glass, and it doesn’t explain every case of moisture inside a car. The windshield is bonded into the vehicle, so water near its edge deserves attention. For general background on windshield construction and function, consider how the glass and surrounding structure work together.
Start by looking for moisture near the windshield: damp headliner edges, wet A-pillar trim, dashboard corners, or carpeting beside the glass. You might also see a water trail or dried residue, or notice a musty odor that returns after the interior seems dry. These clues help narrow down where to investigate, but they don’t identify the cause on their own.
What signs can point to a windshield-area leak?
Pay attention to when moisture appears. Does it follow steady rain, a vehicle wash, or driving in wet conditions? Does it show up only while the vehicle is moving? Timing helps describe the conditions associated with the leak, though it doesn’t prove water entered through the windshield seal.
Record the affected side and location. Note whether the headliner, A-pillar, dashboard edge, or nearby carpet becomes damp, and whether the same area gets wet each time. Look for visible trails without removing trim or pressing tools into the seal. A note such as “damp passenger-side carpet after rain” is more useful than a broad description like “water inside.”
Why a wet spot does not prove the seal is leaking
Water can pass behind trim or along interior surfaces before reaching a visible edge or dripping onto the floor. The wet spot may sit some distance from the entry point. A damp dashboard corner, for example, is a clue about where water appeared, not confirmation that the windshield seal above it has failed.
Other nearby areas, including the cowl at the base of the windshield, roof edges, or door openings, may also be worth considering. Moisture patterns can overlap, so avoid diagnosing the source from appearance alone.
Symptoms suggest a leak path, but they don’t confirm its source. This is the key principle in finding a leak in a windshield seal: track what happens and where, rather than treating one wet patch as a diagnosis.
Take photos of visible water trails, residue, or damp areas before they dry. Add the date, weather or washing conditions, and the location inside the vehicle. Don’t pull trim apart to look for hidden moisture. Clear observations give a glass professional useful context for assessing whether the concern relates to the windshield perimeter or another area.
How Water Can Travel Around a Windshield Seal
A windshield is held in place by a bonded perimeter where the glass meets the vehicle body. That bond helps keep water out, but the edge is not always easy to inspect from inside the cabin. Water may enter at one point, move along a surface or concealed channel, and appear somewhere else. Understanding that route is central to finding a leak in a windshield seal.
Where a windshield leak may begin
A concern may involve the glass perimeter or the bonding material beneath it. Age, damage, or work that has disturbed the bond can warrant an assessment, but a visible gap or interior drip alone doesn’t identify the cause. Avoid probing the edge or adding sealant to a suspected opening. A professional glass inspection can help distinguish a seal-related concern from a crack, chip, or other windshield damage.
Water movement adds another complication. Gravity draws water downward, but the vehicle’s angle can change where it flows. A car parked on a slope may direct water toward one corner. While driving, airflow and motion may alter the path. Hidden spaces behind trim can carry water before it reaches the cabin, so the first visible drip may be far from the entry point.
Nearby sources that can imitate a windshield-seal leak
The windshield perimeter isn’t the only possible route. Water near the base of the glass could be associated with the cowl or a drainage area. Moisture near an upper windshield corner might travel from a roof edge or another body opening. A door-area opening can also direct water toward nearby trim. These are possibilities to investigate, not diagnoses based on where a stain appears.
Glass damage calls for a different assessment from a perimeter leak. A crack or chip is a break in the glass itself; a seal-related concern involves water entering around the glass-to-body edge. The two may produce nearby symptoms, but appearance alone can’t reliably tell them apart. Note whether the glass has visible damage and where moisture first appears. Don’t assume a crack is the source or that a damp edge confirms a failed bond.
A controlled water test can reveal clues about the entry path, but it cannot certify a repair. If a test makes moisture appear near one area, that result helps guide further inspection; it doesn’t establish the underlying cause or prove the vehicle is watertight. Keep the test gentle and localized, and stop if water begins entering the cabin.
Record the weather, whether the vehicle was parked or moving, and which areas became wet. Photos of trails or residue can help show how the pattern changes over time. If moisture persists, a glass professional can assess the windshield and determine whether repair, replacement, or another diagnosis is appropriate. For continuing water-damage concerns, the IICRC standards for water damage and mold offer broader restoration context. A professional windshield glass assessment can help clarify whether the glass is involved.
How to Check for a Windshield Seal Leak Safely
A careful water test can help identify where moisture may be entering, but it should be controlled and easy to stop. Don’t use a pressure washer, force trim aside, or try to seal an area during the test. The aim is to collect useful clues, not to prove the windshield is watertight or confirm a repair.
Before starting, park on level ground in a safe place and turn the vehicle off. Keep the test simple. You’ll need a helper, good lighting, and absorbent material to spot the first sign of water inside.
- 1. Dry the cabin. Blot existing moisture from the headliner edge, trim, dashboard area, or carpet near the windshield. Place a dry paper towel or absorbent cloth near the suspected area, without pushing it into trim or against electrical components. Starting with a dry surface makes new moisture easier to notice.
- 2. Inspect visible edges. With a light, look along the windshield perimeter from inside and outside. Note visible damage, residue, or an area that looks different from the surrounding edge. Don’t insert a tool, pull trim apart, or press hard on the glass or surrounding materials. A visual clue helps focus the test, but it doesn’t establish the cause.
- 3. Assign one person to watch inside. Have your helper remain in the cabin and watch the dry areas near the windshield. The observer should call out the first sign of moisture and its exact location. The person outside should apply the water gently, without directing it at electrical areas or flooding gaps.
- 4. Test a short section at a time. Start with one small section of the windshield perimeter. Use a gentle, steady flow, then pause while the person inside checks for moisture. Move to the next section only if the first remains dry. Avoid soaking the entire windshield at once, since that makes it harder to connect a new drip with a particular test area.
- 5. Record the result and stop. Note which section was tested, where water first appeared, and how long it took. Stop once you have a likely path. End the test immediately if water enters rapidly, visibility becomes impaired, or continuing would require removing trim.
Finding a leak in a windshield seal this way can narrow down where to look, but water may travel before it becomes visible. Treat the result as an observation, not a diagnosis. If the test doesn’t produce a clear pattern or moisture keeps returning, don’t repeat it with stronger water pressure. A professional glass assessment can help distinguish a concern at the windshield perimeter from broader glass damage or another source.
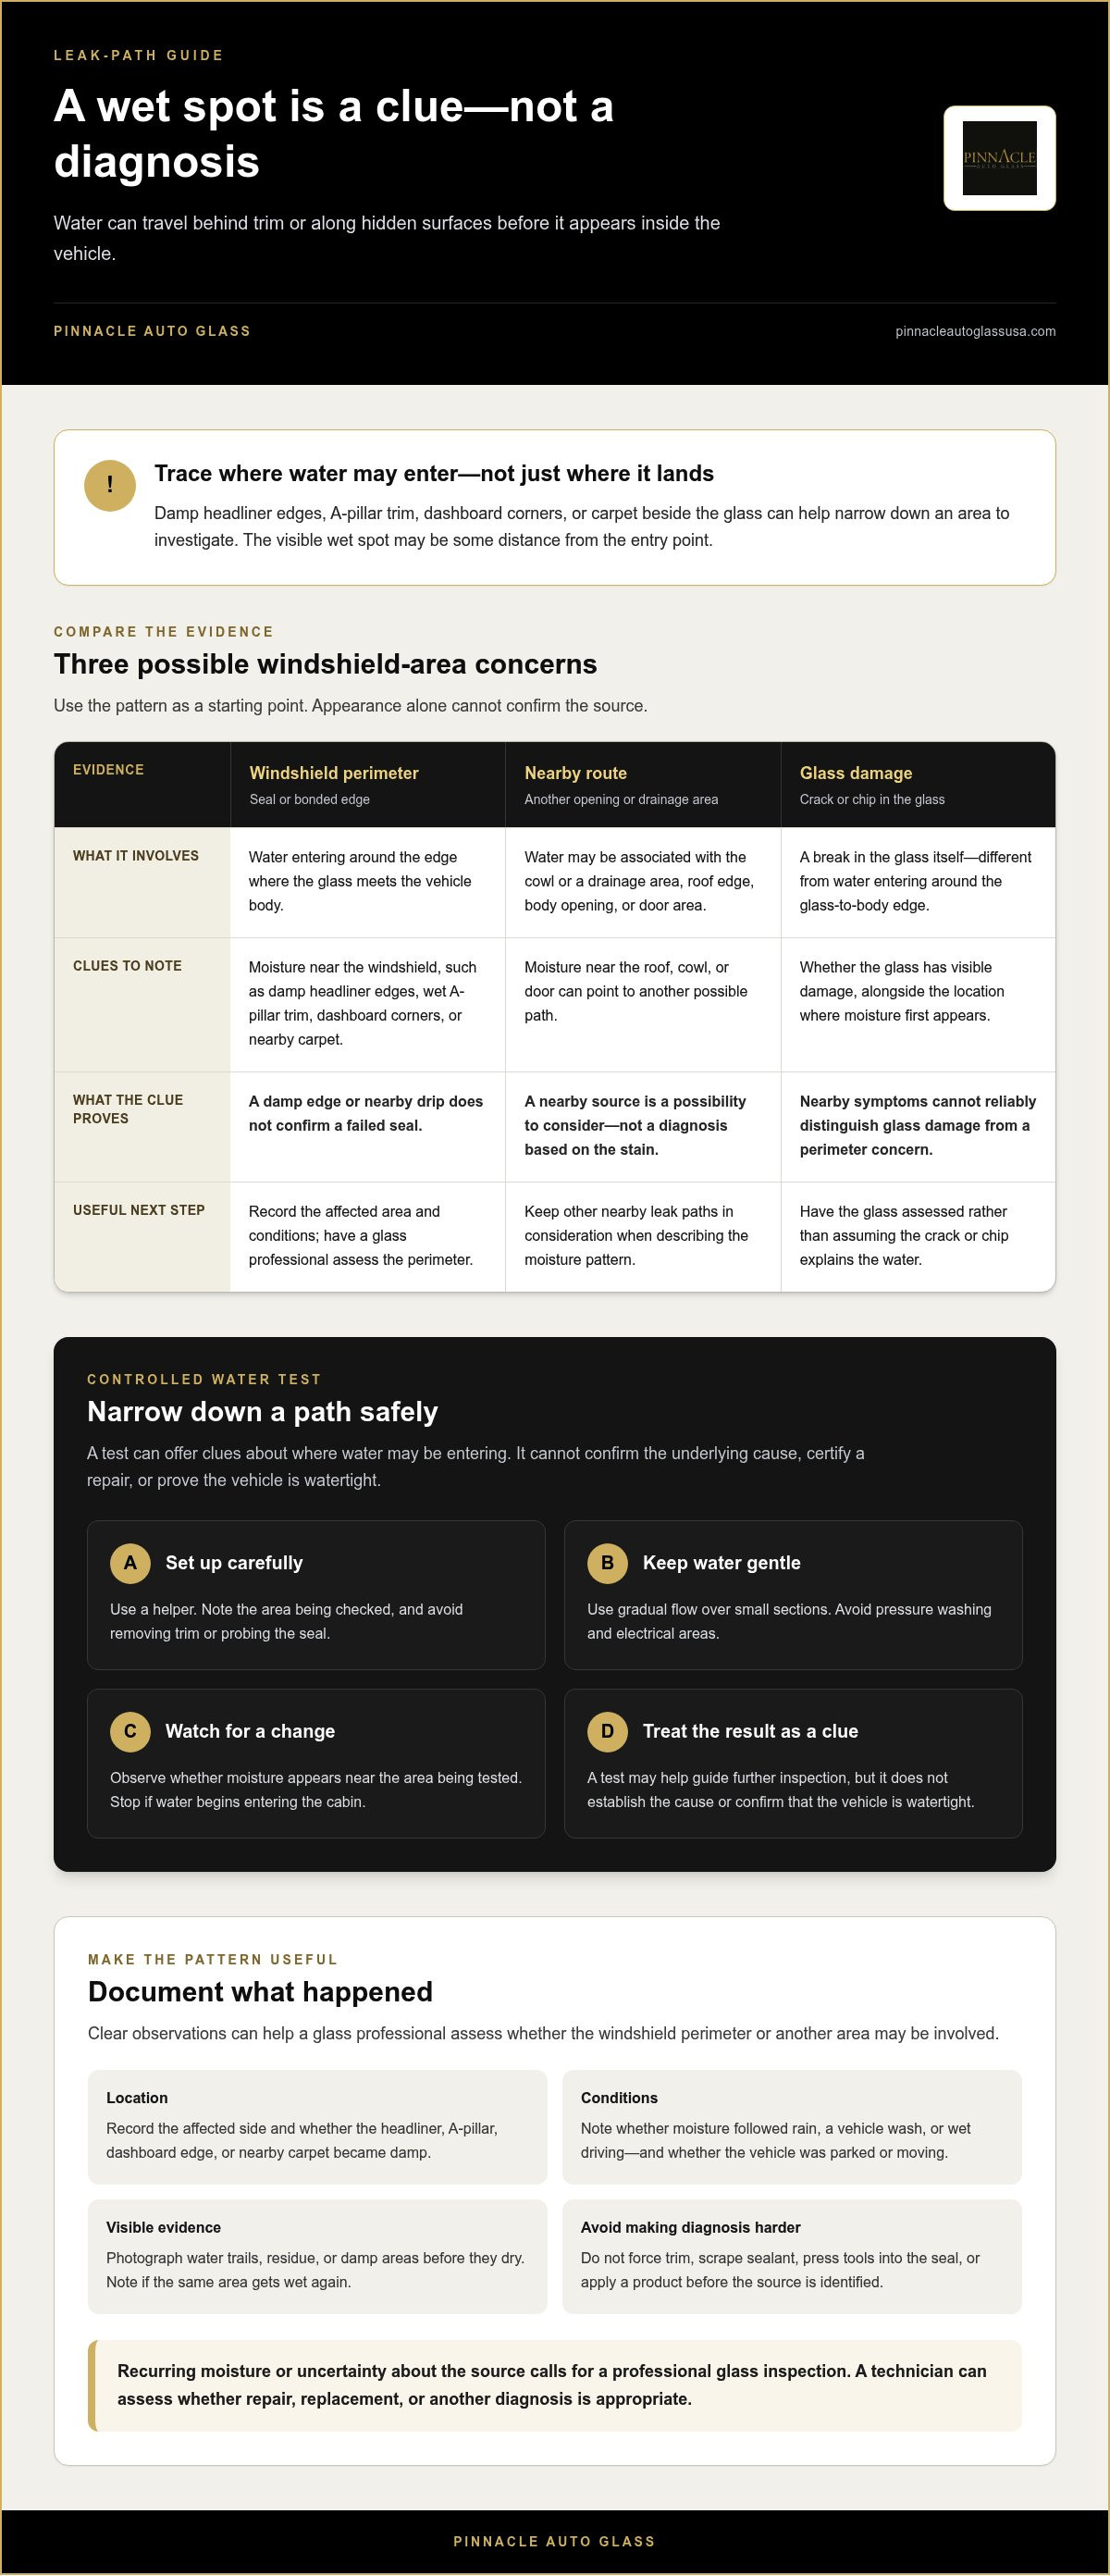
Is It the Windshield Seal or Another Leak? Compare the Evidence
Use the location and timing of moisture to decide what areas may need attention, not to declare a part has failed. Water can travel before it becomes visible, and vehicle design or previous glass and body repairs can affect how symptoms appear. Compare clues across areas before assuming the windshield perimeter is responsible.
Clues that can help separate likely sources
Note where moisture first appears and whether it follows rain, washing, or driving. A damp area close to the glass edge may make the windshield perimeter worth investigating. If water appears first near the roof, door, or base of the windshield, consider those areas too. These patterns are indicators, not proof.
| Area to investigate | Clues to note |
|---|---|
| Windshield perimeter | Moisture or a trail near the glass edge, A-pillar, dashboard corner, or adjacent carpet, especially after rain or washing. |
| Cowl or drainage area | Water near the lower windshield or dashboard after rain or a wash. The cowl and nearby drainage paths may warrant inspection. |
| Roof area | Dampness near an upper windshield corner or headliner edge. Water may have traveled from a roof edge or another body opening. |
| Door area | Moisture around the door opening or nearby trim, sometimes noticed after rain or while driving in wet conditions. |
Record which side gets wet, where you first notice moisture, and what was happening before it appeared. A pattern that changes with vehicle movement or parking angle can be useful context, but it still won’t identify the source on its own. Prior repairs and differences in vehicle construction can also make similar symptoms point to different paths.
Don’t seal the visible wet spot just because it’s easy to reach. Water may be entering elsewhere and traveling behind trim, so covering the place where it drips may leave the actual path open. Adding sealant without identifying the cause can also make a later inspection more difficult.
When a DIY diagnosis should stop
Stop investigating if water continues to enter, the source remains unclear, or access would require removing trim or disturbing bonded glass. Don’t test in unsafe conditions or keep applying water to force a result. A glass professional can assess the windshield and distinguish a seal-related concern from damage that may require windshield repair or replacement.
If inspection indicates that replacement may be relevant, review a professional windshield replacement safety guide to understand why glass work requires care. For an assessment of a suspected windshield-area leak, see professional windshield glass inspection information.
What to Do After Finding a Windshield Leak
Once you’ve noticed a likely leak path, shift from testing to protecting the vehicle and gathering useful details. Repeatedly wetting the area may add moisture without clarifying the cause. A professional glass assessment can help determine whether the concern involves the windshield, nearby damage, or another water-entry source.
- Write down the pattern. Note when the leak occurs, where water first appears, which side is affected, and whether it followed rain, a wash, or driving.
- Save your observations. Keep any test notes and take clear photos of visible moisture, residue, or glass damage. Don’t remove trim to look for hidden water.
- Limit further exposure. Avoid repeat water tests and keep the vehicle protected from additional moisture where practical. If water is entering rapidly or reaching electrical areas, stop testing and arrange an assessment.
- Share relevant history. Mention prior windshield work or known glass damage, since that context may help guide inspection.
These steps make finding a leak in a windshield seal more useful to a technician: the goal is to provide clear clues, not to settle the diagnosis yourself.
What information helps a glass professional assess the issue?
Bring specific observations rather than a conclusion. For example, note that moisture first appeared at the upper passenger-side trim after rain, or that a controlled test produced a drip near a particular perimeter section. Include photos taken before the area dried and mention any visible crack, chip, or past windshield work. Avoid pulling trim apart or disturbing the bonded glass, which can change what the inspection needs to assess.
When windshield repair or replacement may enter the picture
The right next step depends on inspection findings, not the leak symptom alone. A glass professional can assess whether the windshield has damage that may be repaired, whether replacement is appropriate, or whether another source should be investigated. A suspected leak doesn’t automatically mean the glass needs replacing, and no seal treatment should be assumed to solve every case.
If inspection indicates glass damage, a windshield repair guide can explain repair considerations. If replacement is recommended, a windshield replacement safety guide can provide context on why proper glass work matters. These guides are useful background, but they can’t determine what your vehicle needs without an assessment.
Some vehicles have driver-assistance cameras mounted to or near the windshield. When a windshield is replaced, those systems may require ADAS recalibration, depending on the vehicle and work performed. Include any camera or driver-assistance concerns when discussing the assessment so the glass work and related recalibration needs can be considered together.
Pinnacle Auto Glass provides windshield repair and replacement for personal and commercial vehicles, along with ADAS recalibration. A professional glass assessment can help identify the source and determine the appropriate service.
Move From Clues to a Clear Next Step
Finding a leak in a windshield seal is a starting point, not a reason to guess at a fix. If moisture returns or the source remains uncertain, a professional assessment can help clarify what the windshield needs and whether another water-entry area is involved. That gives you a sound basis for deciding what to do next instead of applying a temporary fix that may miss the cause.
Keep your notes and photos handy. They can help explain what you observed and when it happened. If the assessment indicates windshield work is needed, Pinnacle Auto Glass provides repair and replacement for personal and commercial vehicles, as well as ADAS recalibration when applicable.
Get professional windshield repair and replacement support and take the next step with a clearer understanding of the issue. A focused inspection can help you move forward with confidence.
Frequently Asked Questions
How can I tell if my windshield seal is leaking?
Recurring moisture near the windshield edge can indicate a leak, but it doesn’t confirm the seal is the source. Notice whether dampness appears after rain, washing, or driving, and look for water trails or residue near the glass. When finding a leak in a windshield seal, also note whether the same area gets wet repeatedly. Water can travel behind trim, so the visible drip may not reveal where it entered.
Can I use a garden hose to find a windshield leak?
Yes, a garden hose can help you look for clues if you use a gentle, controlled flow. Have someone watch inside while you test one short area at a time. Avoid a pressure washer, electrical areas, and directing a forceful stream into trim or gaps. Stop if water enters quickly or the test becomes unsafe. A hose test can suggest a path, but it can’t confirm the cause or prove a repair worked.
Is water leaking through a windshield seal dangerous?
A leak can become a safety and vehicle-care concern if it persists. Moisture may damage interior materials, create a musty odor, or affect nearby electrical components if water reaches them. A suspected leak also deserves attention if the windshield is cracked, loose, or visibly damaged. Don’t assume the leak itself means the glass is unsafe, but arrange a glass assessment if you notice damage or recurring water intrusion.
What can cause water to leak around a windshield?
Possible causes include deterioration or damage around the glass-to-body bond, or a problem related to prior windshield installation. A crack or chip may also allow water in through the glass itself, which is different from a perimeter leak. Water can also come from nearby areas, such as the cowl, roof, or door opening. Symptoms alone can’t identify which source is responsible, so inspection may be needed.
Can windshield seal leaks be fixed without replacing the windshield?
Sometimes replacement may not be necessary, but the right solution depends on what inspection finds. A professional needs to distinguish a concern at the windshield perimeter from glass damage or a leak coming from another area. Don’t assume applying sealant over a visible gap will solve the problem; it may hide clues without addressing the entry point. If the windshield is damaged or its installation is involved, replacement may be appropriate.
Why is my car wet inside when the windshield looks intact?
Water can enter around the windshield perimeter even when the glass has no visible crack or chip. It may also come from another opening, such as a door, roof edge, or area near the cowl, then travel behind trim before appearing inside. Check whether the wet area changes after rain, washing, or driving, and note what you observe. An intact-looking windshield doesn’t identify the source by itself.
What should I do if water leaks into my car during rain?
Blot up accessible moisture and move items away from the wet area. Avoid repeatedly testing the leak or removing trim to search behind it. Record when the water appears, where you first notice it, and whether you see glass damage; photos can help document the pattern. If water reaches electrical areas, avoid handling wet components. Arrange a professional glass assessment if the leak recurs or the source is unclear.


