

That blue painter's tape on your car isn't just a reminder of your appointment; it's a structural bridge holding your safety system together. Many drivers feel uncertain about removing tape after windshield replacement because they don't want to compromise the adhesive seal. It's a valid concern, as a shifted windshield can lead to leaks or reduced structural integrity. You want the tape removed to restore your vehicle's appearance, but you need to avoid damaging the paint or leaving behind residue. We provide the clarity you need to handle this final step with professional precision.
This guide details the exact timeline and techniques required for proper post-installation care. You'll learn how to protect the polyurethane seal and keep your vehicle's finish pristine. We'll walk through the critical curing window, safe residue removal methods, and the environmental factors that dictate when your car is truly ready. Our goal is to ensure you have total confidence in your vehicle's safety and appearance.
Key Takeaways
- Learn why retention tape is vital for preventing glass creep and securing the polyurethane adhesive during the critical first hours.
- Follow the industry-standard 24-hour rule for removing tape after windshield replacement to ensure a fully cured, waterproof seal.
- Use the "Slow and Low" technique at a 45-degree angle to safely peel away tape without damaging your vehicle's paint or finish.
- Identify safe, non-abrasive cleaning methods to remove any remaining adhesive residue without scratching the new glass.
- Discover how professional aftercare directly impacts your vehicle's structural safety and the performance of your passenger-side airbags.
The Purpose of Retention Tape in Windshield Replacement
Retention tape is a specialized, low-tack adhesive designed to stabilize your new glass during the critical initial curing phase. It isn't standard masking tape. Its primary function is preventing "glass creep," a situation where the heavy laminated safety glass slides downward before the adhesive sets. Because the windshield is one of the heaviest components of your car's exterior, gravity is a constant threat to a fresh installation. This tape provides the mechanical support needed to keep the glass perfectly aligned with the vehicle frame.
Beyond fighting gravity, the tape acts as a vital shield against road vibrations and wind pressure. Even a short drive home puts stress on the new seal. The tape absorbs these minor movements, preventing the glass from shifting and breaking the adhesive bond. It also serves as a temporary moisture barrier. While the outer layer of the polyurethane "skins over" relatively quickly, the tape keeps water and dust away from the sensitive edges while the inner layers continue to harden.
How Urethane Adhesive Works
Professional windshield replacements use high-grade polyurethane adhesives that create a structural bond. This isn't a simple glue; it's a chemical reaction that links the glass, the primer, and the metal frame into a single unit. Environmental factors like humidity and temperature significantly impact how fast this happens. High humidity often speeds up the process, while cold, dry air can extend the timeline. Technicians focus on the Safe Drive-Away Time (SDAT), which is the minimum time required for the bond to be strong enough to withstand a collision. However, reaching a full cure takes much longer, which is why technicians recommend waiting before removing tape after windshield replacement.
Why You Can't Skip the Tape
Modern vehicles rely on the windshield for more than just visibility. It's a mounting point for Advanced Driver Assistance Systems (ADAS). These cameras and sensors require exact positioning to function correctly. If the glass shifts by even a few millimeters, your lane-keep assist or emergency braking might malfunction. Shifting also leads to physical defects like annoying wind whistles or water leaks that can damage your interior. Technicians use high-visibility blue or yellow tape as a reminder that the installation is still settling. Taking the tape off too early or neglecting its use entirely compromises the structural integrity of the repair. Understanding these risks is essential when you're finally removing tape after windshield replacement.
The Critical Timeline: When to Remove the Tape Safely
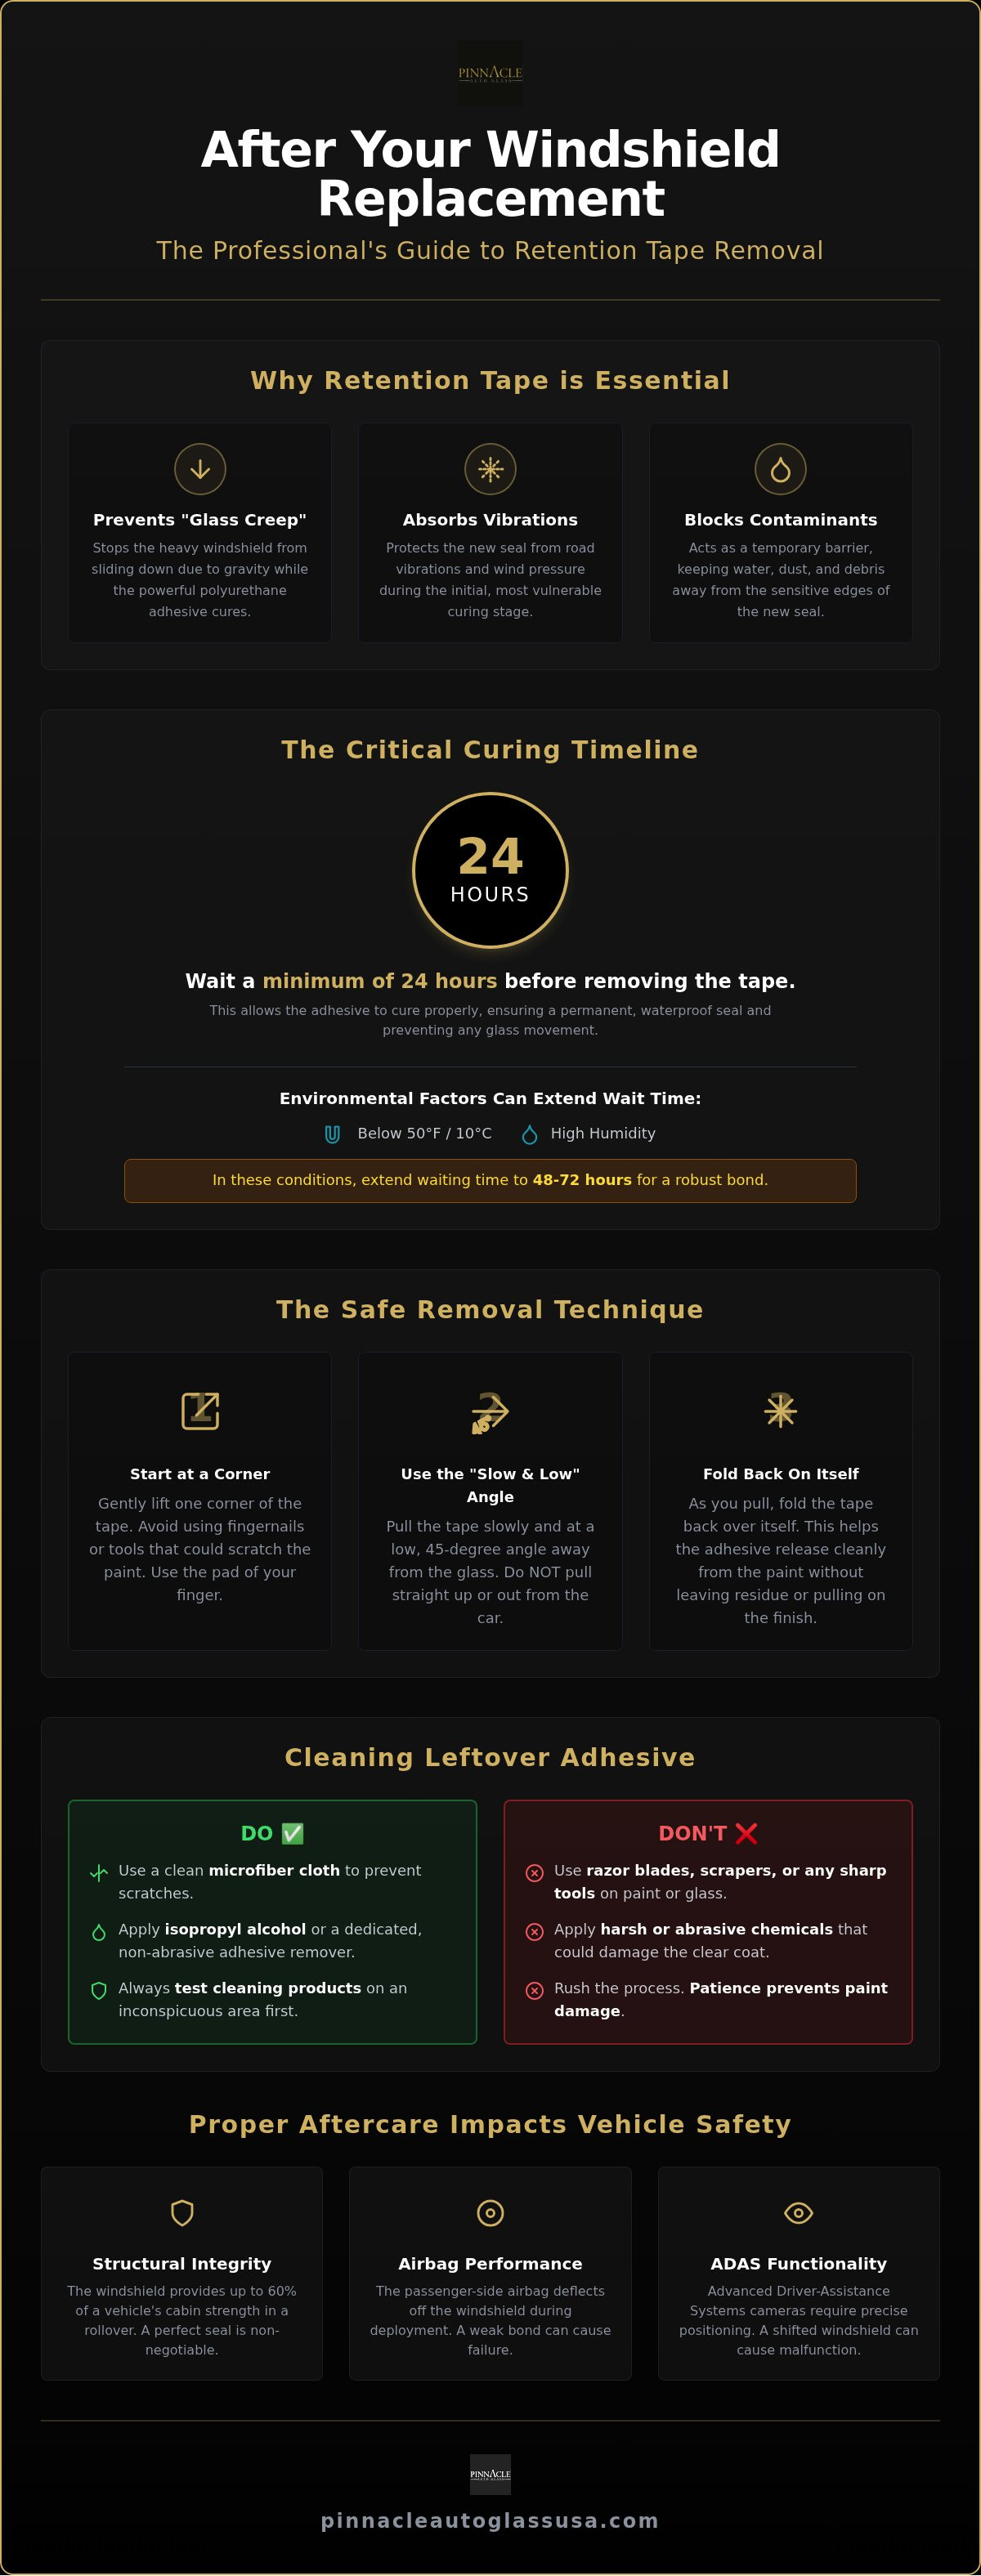
The industry standard for removing tape after windshield replacement is a minimum of 24 hours. While your vehicle is typically safe to drive within one to two hours of installation, the retention tape serves a different purpose than the initial drive-away safety. It provides mechanical support while the polyurethane adhesive moves from its initial set to a more permanent, structural cure. Removing the tape too early can lead to "glass creep," where the weight of the windshield causes it to shift slightly, potentially compromising the seal's integrity.
Most technicians recommend a 24-hour wait for temperate climates. However, research from August 2026 suggests that in specific environmental conditions, such as temperatures below 50°F or during periods of high humidity, extending this window to 48 or even 72 hours is a safer approach. This extra time ensures the bond is robust enough to withstand the internal cabin pressure changes that occur when you close your car doors. If you are unsure about your specific installation, consulting with professional auto glass services can provide clarity based on the specific adhesive used.
The 24-Hour Standard Explained
During the first 24 hours, the adhesive undergoes a chemical transformation. It remains somewhat pliable, which is why the tape is necessary to keep the glass from vibrating or sliding. You can drive during this window because the adhesive has reached its Safe Drive-Away Time (SDAT), but the seal isn't yet ready for the lateral stress of tape removal or the high pressure of a car wash. You should track the time from the exact moment the technician completes the job. Avoid the temptation to peel the tape back early just to check the paint; the risk of disturbing the curing process outweighs the aesthetic benefit.
Weather and Environmental Variables
Environmental factors play a massive role in the curing schedule. Rain isn't necessarily your enemy, as moisture actually triggers the curing process in many modern urethanes. However, the tape itself can become problematic if it gets soaked and then dries in direct, intense sunlight. This can lead to the adhesive "baking" into your vehicle's clear coat, making the eventual cleanup much more difficult. High heat can also cause the tape's adhesive to transfer onto the metal frame, leaving a stubborn residue.
Adherence to Federal Motor Vehicle Safety Standards is only possible when the installation remains undisturbed during the cure. In extreme cold, the chemical reaction slows down significantly. If you're removing tape after windshield replacement in winter conditions, wait at least 48 hours to be certain the bond has stabilized. Signs that your windshield is ready include a lack of "tackiness" at the visible edges of the seal and a tape surface that feels dry and easy to lift at the corners.
Removing Tape After Windshield Replacement Guide
Before you begin removing tape after windshield replacement, move your vehicle into a shaded area. The metal frame must be cool to the touch. Sunlight heats the car's surface, causing the tape's adhesive to become gummy and difficult to manage. If the metal is hot, the tape is more likely to tear or leave behind a stubborn residue that requires extra cleaning. Taking five minutes to let the vehicle cool ensures a much smoother process.
The "Slow and Low" technique is the professional method for a clean finish. Pull the tape back at a 45-degree angle toward the roof or side pillars. This specific angle minimizes the vertical stress on your vehicle's paint and prevents the tape from snapping. Fast, jerky movements are the primary cause of tape failure. Maintain a steady, controlled pace to ensure the adhesive lifts cleanly from the clear coat without leaving a trail of debris.
Directional removal is critical for protecting the new seal. Always pull the tape away from the glass, never toward it. Pulling toward the glass can create outward pressure on the curing urethane, potentially creating small gaps. As you lift the tape, perform a visual inspection. Check for any signs that the glass has shifted or that the urethane has pulled away from the frame. Maintaining the Auto Glass Replacement Safety Standard (AGRSS) requires that the seal remains undisturbed during this final stage of aftercare.
The Removal Process
Start by catching a corner of the tape with your fingernail. Never use metal tools, screwdrivers, or razor blades to lift the edges. These tools easily scratch your car's paint and can slice into the fresh seal. Once you have a grip, maintain even tension. If you feel the tape resisting or if it starts to tear into small pieces, slow down your pace. You can use your free hand to gently support the glass near the removal point if you feel any unusual vibration or resistance.
Safety Precautions During Removal
Avoid using a heat gun or a hair dryer to loosen the retention tape. While heat softens adhesive, it can also compromise the curing polyurethane seal underneath. High heat can lead to "bubbles" or gaps in the urethane that cause future leaks. If the tape feels significantly stuck or "welded" to the paint, try using a small amount of room-temperature water and a soft cloth first. If you notice any large gaps or visible bubbles in the adhesive as the tape comes off, contact your technician immediately to verify the seal's integrity before driving at highway speeds.
Dealing with Adhesive Residue and Post-Removal Care
Once you finish removing tape after windshield replacement, you might notice small patches of sticky residue on your vehicle's paint or the glass surface. It's important to identify exactly what you're looking at before you start cleaning. Tape residue is typically clear or white and feels tacky to the touch. In contrast, excess urethane appears as a thick, black, rubbery substance. If you find urethane on your paint, avoid aggressive scrubbing, as this can smear the material or damage your clear coat. Contact your installer to handle any structural adhesive cleanup.
Start your post-removal care with the gentlest method possible. A mixture of mild dish soap and warm water applied with a clean microfiber cloth usually handles most tape residue. Microfiber is essential because it traps particles without scratching the glass or paint. Keep all cleaning agents away from the very edge of the windshield. This "no-chemical" zone is where the seal is most vulnerable while it continues to reach a full structural cure over the coming days.
Safe Residue Removal Techniques
The "tape-to-tape" method is a highly effective, dry way to lift stubborn adhesive. Take a fresh piece of painter's tape, wrap it around your finger with the sticky side out, and gently dab the residue. The adhesive on the new tape will often pull the old residue off the car without the need for liquids. If this fails, 70% isopropyl alcohol is the safest solvent for automotive finishes. Apply a small amount to a cloth first rather than pouring it onto the vehicle. Petroleum-based products must be avoided near the glass seal because they can chemically degrade the polyurethane adhesive and cause the bond to fail.
The First 48 Hours After Tape Removal
Even after the tape is gone, the curing process isn't entirely finished. Avoid automated car washes, especially high-pressure or touchless systems, for at least 48 hours following tape removal. These systems use aggressive chemicals and water jets that can force moisture into a seal that hasn't fully hardened. You should also leave one window cracked about an inch when parking. This prevents sudden air pressure spikes from shifting the glass when you slam the doors. For a comprehensive look at long-term maintenance, review our guide on windshield replacement safety. If you have any concerns about the integrity of your new seal, contact our expert team for a professional assessment.
Ensuring Your Windshield Meets Safety Standards
Safety standards are the cornerstone of professional vehicle glass services. A successful installation ensures that the windshield functions as a critical safety component during a collision. For example, the passenger side airbag relies on the windshield to act as a backstop during deployment. If the adhesive bond is weak or the glass has shifted, the force of the airbag can actually push the windshield out of the frame. This failure leaves the passenger without protection. Removing tape after windshield replacement is the final step in confirming that the glass is seated correctly and the bond is secure.
Professional installation provides the foundation for this safety. While the tape is a temporary tool, its presence and correct removal verify that the technician followed necessary protocols. After you finish removing tape after windshield replacement, you must remain vigilant for red flags. Wind whistling at highway speeds is a common sign of a pinhole leak in the urethane. Similarly, water spots on the interior dashboard or visible gaps between the glass and the molding indicate a compromised seal. These issues require immediate professional attention to prevent structural failure.
Modern vehicles also integrate Advanced Driver Assistance Systems (ADAS) directly into the glass. Cameras and sensors mounted on the windshield control features like lane keep assist and automatic emergency braking. Even a slight misalignment during the curing phase can throw these systems off. Ensuring the glass stays exactly where it was set is why retention tape is so vital. Professional recalibration is the only way to guarantee these safety systems function correctly after the glass is replaced.
Structural Integrity and Safety
The windshield provides up to 60% of a vehicle's structural integrity during a rollover accident by supporting the roof. This is why certified auto glass technicians use specific high visibility retention tapes. These tapes are engineered to hold heavy glass in place without stretching or failing under wind load. When you peel the tape away, you are essentially confirming that the structural bond has taken over the job of securing the glass. If the glass feels loose or vibrates during this process, the bond may not have reached the required strength.
Next Steps If You Spot an Issue
If you notice any of the red flags mentioned above, call your technician immediately for a seal inspection. This check can identify if the urethane needs a touch up or if the glass needs to be reset entirely. Safety should never be a guessing game. Additionally, remember that ADAS calibration auto glass services are necessary to align your safety sensors with the new glass placement. This recalibration ensures your vehicle's safety technology functions as the manufacturer intended. Trust Pinnacle Auto Glass for your professional windshield needs.
Master Your Post-Installation Aftercare
Proper aftercare is just as critical as the installation itself. The 24-hour curing window is a non-negotiable requirement for a waterproof and structural bond. When you're finally removing tape after windshield replacement, use the "Slow and Low" technique to prevent paint damage and ensure the polyurethane remains undisturbed. These small steps guarantee that your windshield provides the roof-crush protection and airbag support you need in an emergency.
If you notice any whistling or moisture after the tape is gone, don't wait to address it. Schedule your professional windshield replacement with Pinnacle Auto Glass today to benefit from our nationwide mobile service and high-quality OEM-equivalent glass. Our certified ADAS recalibration experts ensure your safety sensors are perfectly aligned before you hit the road. You've invested in a quality replacement; now, ensure it stays secure and reliable. Enjoy the clarity and safety of your new view.
Frequently Asked Questions
Is it okay if it rains before I remove the windshield tape?
Yes, rain is perfectly acceptable and can actually help the curing process. Most professional-grade polyurethane adhesives are moisture-cured, meaning humidity and rain trigger the chemical reaction that hardens the seal. The retention tape acts as a barrier, preventing heavy rain from washing away the adhesive before it skins over. You don't need to worry about a light shower, but avoid high-pressure car washes until the seal is fully cured.
What happens if I remove the tape earlier than 24 hours?
Removing the tape earlier than 24 hours increases the risk of "glass creep," where the weight of the windshield causes it to slide downward. This shift can create gaps in the seal, leading to water leaks or wind noise. It also threatens the alignment of ADAS cameras. Adhering to the timeline for removing tape after windshield replacement ensures the adhesive is strong enough to hold the glass in place without mechanical support.
Can I drive on the highway with the tape still on the windshield?
You can drive on the highway, but it's best to avoid excessive speeds for the first 24 hours. High-speed driving creates significant wind pressure that can push against the fresh seal. While the tape provides support, it isn't designed to withstand the force of highway speeds combined with road vibrations during the initial cure. If you must drive on the highway, keep your speed moderate and avoid sudden maneuvers that might stress the bond.
What is the best way to get sticky tape residue off my car paint?
The most effective and safest method is using mild dish soap and warm water with a clean microfiber cloth. If the residue persists, apply a small amount of 70% isopropyl alcohol to the cloth and gently rub the area. Avoid using abrasive pads or metal scrapers, as these will permanently scratch your vehicle's clear coat. Always test a small, inconspicuous area first to ensure the cleaner doesn't react with your car's specific paint finish.
Will the tape damage my car's clear coat if it gets too hot?
Retention tape is designed for automotive use, but extreme heat can cause the adhesive to bond too strongly to the clear coat if left on too long. This is often called "baking." To avoid this, follow the standard timeline for removing tape after windshield replacement, typically between 24 and 48 hours. If the car must sit in direct sunlight, try to remove the tape as soon as the 24-hour window closes to prevent the adhesive from becoming gummy.
Do I need to leave my windows down after the tape is removed?
You should keep at least one window cracked about an inch for the first 48 hours, even after the tape is removed. This prevents air pressure spikes inside the cabin. When you close a car door with all windows up, the sudden burst of pressure can actually push the new windshield outward, creating a gap in the curing seal. Leaving a window down slightly provides an escape route for that air, protecting the structural integrity of the bond.
Can I use Goo Gone to remove windshield tape residue?
You can use Goo Gone, but you must apply it with extreme caution. Never spray it directly onto the car; instead, put a small amount on a soft cloth. Ensure the chemical does not touch the edge of the glass where it could seep into the new polyurethane seal. Petroleum-based cleaners can degrade the adhesive bond over time. For most situations, soap and water or 70% isopropyl alcohol are safer alternatives for your vehicle's finish and the new seal.
What should I do if the windshield starts whistling after I take the tape off?
If you hear a whistling sound after taking the tape off, contact your installation technician immediately. This noise is a clear indicator that there is a small gap or pinhole in the adhesive seal. While it might seem like a minor annoyance, any gap can lead to water leaks and reduced structural safety during a collision. A professional will need to inspect the seal and determine if the glass needs a secondary bead of urethane or a full reset.


