

Successful windshield replacement is a 48-hour safety protocol, not a one-hour service appointment. While the physical installation happens quickly, the integrity of your vehicle depends on what happens after the technician leaves. Following proper windshield replacement aftercare instructions is the only way to prevent leaks, whistling, or the catastrophic failure of your safety glass during an accident. It's the difference between a temporary fix and a permanent safety solution.
It's frustrating to wait for your car to be ready, especially when you're worried about ADAS recalibration or when you can finally visit the car wash. We understand that you want your vehicle back to normal without compromising the structural seal or your safety sensors. This guide provides a definitive 2026 safety checklist to help you master the curing process and maintain your vehicle's safety technology. You'll learn exactly how to protect the new urethane seal, when it's safe to return to high-speed driving, and how to verify that your cameras and sensors are functioning perfectly. We've simplified the technical requirements into a clear timeline so you can drive with total confidence.
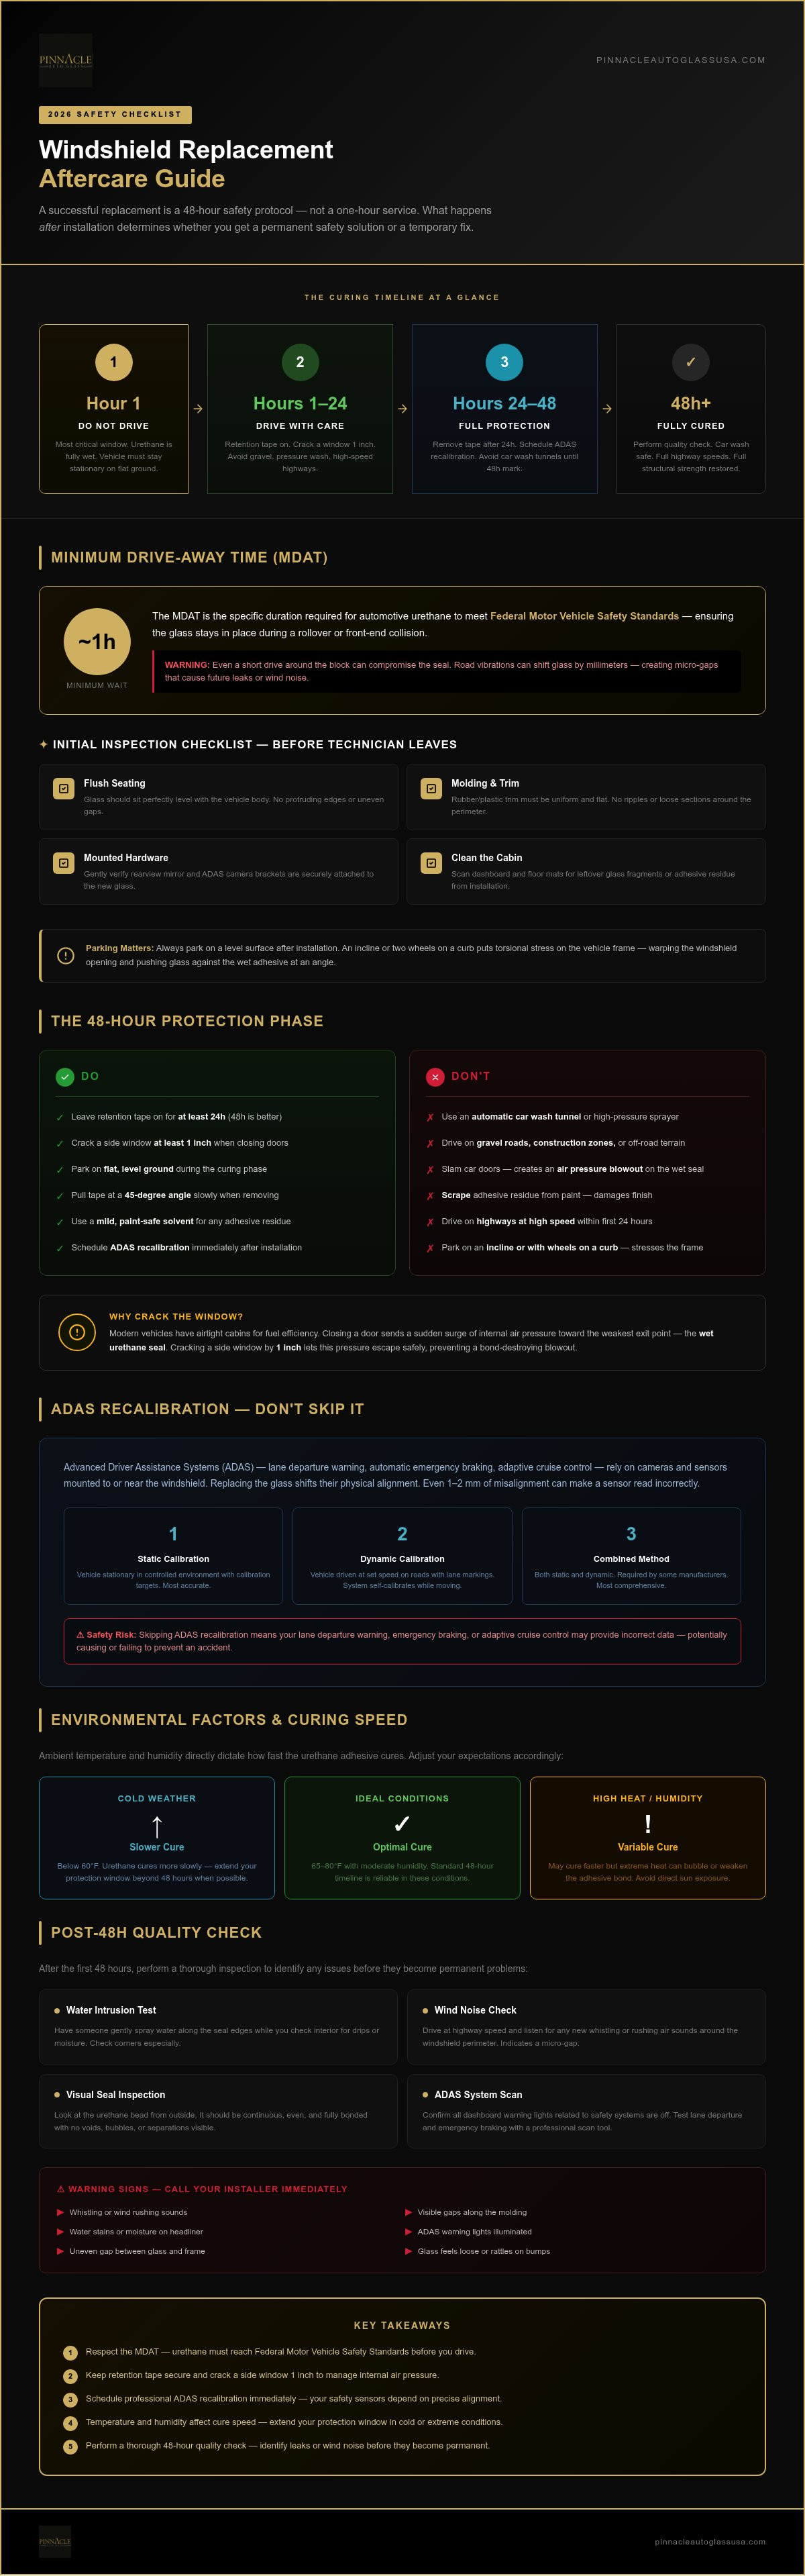
Key Takeaways
- Respect the Minimum Drive-Away Time (MDAT) to ensure the urethane adhesive establishes a primary safety bond before you operate the vehicle.
- Follow essential windshield replacement aftercare instructions such as keeping retention tape secure and cracking a side window to manage internal air pressure.
- Ensure your safety technology remains functional by scheduling professional ADAS recalibration immediately following your glass replacement.
- Adjust your expectations based on ambient temperature and humidity as these environmental factors directly dictate the adhesive's curing speed.
- Perform a thorough quality check after the first 48 hours to identify signs of water intrusion or unusual wind noise before they become permanent issues.
Immediate Post-Installation: The Critical First Hour
The moment your technician finishes the installation, a chemical countdown begins. The first 60 minutes are the most vulnerable for the new seal. You must prioritize these initial windshield replacement aftercare instructions to ensure the adhesive cures without interference. Don't rush into the driver's seat. Your vehicle needs to remain stationary to allow the bond to stabilize against the frame.
What is Minimum Drive-Away Time (MDAT)?
The Minimum Drive-Away Time (MDAT) is the specific duration required for the automotive urethane to meet Federal Motor Vehicle Safety Standards. It ensures the glass stays in place during a rollover or front-end collision. While 2026 adhesive technologies have reduced these wait times significantly, the 'no-drive' window remains a non-negotiable safety requirement. Even a short trip around the block can compromise the seal. Vibrations from the road or a sudden change in speed can cause the glass to shift by millimeters; this creates micro-gaps that lead to future leaks or wind noise.
Initial Inspection Checklist
Perform a visual audit before the technician departs. This confirms the installation meets professional standards and prevents immediate complications. Use the following checklist:
- Check flush seating: The glass should sit perfectly level with the vehicle's body. Look for any protruding edges or uneven gaps.
- Inspect molding and trim: The rubber or plastic trim around the perimeter should be uniform and flat. There shouldn't be any ripples or loose sections.
- Verify mounted hardware: Gently check the rearview mirror and any ADAS camera brackets. They must be securely attached to the new glass.
- Clean the cabin: Scan the dashboard and floor mats for any leftover glass fragments or adhesive residue.
Where you park during this first hour matters just as much as how long you wait. Always choose a level surface. Parking on an incline or with two wheels on a curb puts torsional stress on the vehicle's frame. This frame twist can subtly warp the windshield opening, forcing the glass against the wet adhesive at an angle. Keep the car on flat ground to maintain the intended geometry of the seal.
The 48-Hour Protection Phase: Essential Dos and Don'ts
Once the initial hour passes, your vehicle enters the most critical stage of the curing process. While the car is technically drivable, the adhesive hasn't reached its full structural strength. Adhering to these windshield replacement aftercare instructions for the next 48 hours prevents the glass from shifting or the seal from failing prematurely. This phase requires a proactive approach to protect your investment and your safety.
Managing Retention Tape and Seal Integrity
Technicians often apply blue or yellow retention tape to the top of the glass. This tape isn't a permanent fixture; it's a temporary structural support. It holds the windshield in place during the "green" cure phase when the urethane is still pliable. Leave this tape on for at least 24 hours, though waiting the full 48 hours is better. When you're ready to remove it, pull the tape slowly away from the paint at a 45-degree angle. This technique prevents adhesive transfer or paint damage. If any residue remains, use a mild, paint-safe solvent rather than scraping the surface.
Pressure and Vibration Management
Modern vehicles are designed with airtight cabins to improve fuel efficiency and noise reduction. This creates a hidden risk for a new windshield. When you close a door, the sudden surge in internal air pressure seeks the weakest exit point. In a freshly installed windshield, that exit is the wet urethane seal. Cracking a side window by at least one inch allows this pressure to escape safely. It prevents an air pressure "blowout" that can ruin the watertight bond. This is especially vital for commercial operators who manage fleet glass services, as drivers must be briefed on these pressure risks to maintain vehicle uptime.
Similarly, avoid excessive vibrations that can rattle the glass before the bond is permanent. Skip the gravel roads, construction zones, or off-road paths for two days. Rough terrain causes chassis twist, which puts uneven stress on the new seal. Your cleaning habits must also change temporarily. Avoid automatic car wash tunnels and high-pressure sprayers for 48 hours. The force of the water can push through the curing seal, and the harsh chemicals may degrade the urethane. Stick to a gentle hand wash if necessary, but avoid the glass area entirely. Finally, close your doors gently. Heavy slamming creates the same pressure spikes as driving with closed windows, threatening the integrity of your new safety glass.
ADAS Recalibration: Integrating Safety Tech into Aftercare
Modern windshields are more than just glass; they are a mounting platform for Advanced Driver Assistance Systems (ADAS). Your windshield replacement aftercare instructions are incomplete if they don't address the digital eyes of your vehicle. Cameras and sensors mounted behind the rearview mirror rely on perfect optical clarity and precise positioning. If these systems aren't recalibrated after the glass is swapped, your car's safety features may become a liability rather than a safeguard.
Why Glass Replacement Affects Your Sensors
A new windshield physically changes your vehicle's camera perspective. Even a millimeter difference in glass thickness or a slight variation in the mounting angle shifts the camera's focal point. This misalignment causes uncalibrated systems to provide false alerts or fail to engage brakes during an emergency. This is why ADAS calibration after windshield replacement is vital. Relying on certified auto glass technicians ensures these sensors meet factory specifications.
Technicians use two primary methods to reset these systems: static and dynamic calibration. Static calibration involves using specialized targets in a controlled shop environment. Dynamic calibration requires driving the vehicle at specific speeds on well-marked roads to teach the system how to "see" again. Confirm which method your vehicle required and that the technician successfully completed the process before you drive away.
Post-Calibration Driver Checklist
Monitor your safety systems closely once you're back on the road. Your observation is the final layer of quality control. Ensure these tech-focused windshield replacement aftercare instructions are part of your first drive:
- Verify Lane Keep Assist reads road markings accurately without drifting.
- Confirm Adaptive Cruise Control maintains correct following distances.
- Check that Forward Collision Warning functions in controlled environments.
- Ensure the Lane Departure Warning provides timely alerts.
Scan the dashboard for any persistent warning lights. While the technician handles the technical reset during the initial service window, a camera or sensor malfunction light may appear if the system detects an alignment error. If this happens, return to the service center immediately. These systems are often interconnected; a failure in one sensor can disable multiple safety layers, leaving you unprotected in a collision.
Environmental Factors: How Weather Affects the Curing Process
The weather acts as a silent participant in your windshield installation. While previous sections focused on physical handling, the atmosphere surrounding your vehicle directly dictates the chemical cure rate of the adhesive. Following these windshield replacement aftercare instructions requires adjusting your expectations based on local climate conditions. This ensures the urethane reaches its peak structural integrity without being compromised by environmental stressors.
Temperature and Humidity Variables
Most modern automotive urethanes are moisture-curing adhesives. This means they require a specific level of humidity to transition from a liquid state to a solid safety bond. High humidity environments often accelerate the curing process; conversely, extremely dry air can extend the necessary wait time. Temperature also plays a critical role. Aim to keep the vehicle in a stable environment between 40°F and 90°F during the first 24 hours. Extreme cold can make the adhesive brittle before it fully sets. Meanwhile, intense, direct sunlight causes the glass to expand at a different rate than the vehicle frame. Parking in a garage or a shaded area provides the thermal stability the seal needs to cure evenly.
Dealing with Rain and Moisture
Drivers often worry about rain immediately after a replacement. Paradoxically, light moisture can actually benefit the curing process of moisture-curing urethanes once the initial hour has passed. However, heavy downpours or standing water pose a significant threat. A torrential rainstorm puts physical weight on the glass and can force water through the seal before it is completely watertight. Use these rules to manage moisture exposure:
- Avoid using a car cover. It traps moisture and heat against the paint, which can warp the curing seal.
- Dry the edges of the glass gently with a microfiber towel if the car was caught in a light shower.
- Keep the vehicle under a carport if a heavy storm is forecasted within the first 24 hours.
Internal climate control is equally important for a successful bond. Avoid using the "Max AC" or heavy-duty defroster settings for the first day. These settings create a massive temperature differential between the inside and outside of the glass. This rapid change causes the glass to expand or contract, putting unnecessary stress on the fresh adhesive. If you need professional assistance to ensure your vehicle is ready for any climate, schedule your windshield replacement with our expert team today. Maintaining a neutral internal temperature helps the seal settle without fighting the physics of thermal expansion.
Post-Installation Quality Check: Ensuring a Permanent Seal
Once the 48-hour curing window closes, your responsibility shifts from protection to verification. A high-quality installation should be indistinguishable from the factory seal. Following your windshield replacement aftercare instructions means performing a final, active audit of the glass and its surrounding components. This step is particularly vital for logistics managers overseeing fleet vehicles, where a single faulty seal can lead to costly downtime or safety hazards across multiple units.
Start your audit on the highway. Turn off the radio and listen for any unusual wind noise or "whistling" sounds at speeds over 50 mph. These sounds often indicate a micro-gap in the urethane bead where air is forcing its way through. Next, perform a water intrusion test after the first rain or a gentle hand wash. Don't just look at the glass; check the cabin floor mats and the dashboard's edge for dampness. Water often tracks down the interior pillars before pooling in the footwell.
Warning Signs of a Faulty Installation
Identifying problems early prevents structural degradation. Look for these specific red flags:
- Whistling or Hissing: This is a definitive sign of an incomplete adhesive seal. It's not just a noise issue; it's a safety failure.
- Visual Distortion: Look through the glass at various angles. If you see "waves" or blurring, the glass may be a low-quality aftermarket part that lacks proper optical standards.
- Glass Vibration: If the windshield feels like it's fluttering or vibrating at high speeds, the adhesive may not have bonded correctly to the pinchweld.
- Shifting Molding: Inspect the exterior trim. If it's pulling away or looks crooked, the glass may have moved during the cure.
When to Call a Professional
Don't attempt to "patch" a leaking new windshield yourself. If you detect any moisture inside the cabin, contact your technician immediately. A leak indicates that the structural bond is compromised, and the entire glass unit may need to be reset to ensure safety. Similarly, if ADAS dashboard errors persist or safety sensors behave erratically, the vehicle requires professional recalibration to align with the new glass.
Remember that windshield repair is no longer an option once a replacement has been poorly executed. You can't simply fill a gap in the adhesive like you would a stone chip. A failed replacement requires a total redo to maintain the vehicle's structural integrity. By verifying the results of your professional windshield replacement, you ensure that your car remains a safe environment for every passenger.
Securing Your Vehicle's Structural Integrity
Mastering your windshield replacement aftercare instructions ensures that your new glass provides the safety and clarity you expect. The path to a permanent seal requires patience during the critical 48-hour curing window. It's vital to respect the Minimum Drive-Away Time and manage internal cabin pressure to prevent micro-gaps. Additionally, verifying ADAS functionality is a fundamental requirement for modern road safety.
Our team delivers the precision and technical expertise required for high-stakes glass installations. We provide expert ADAS recalibration as a standard protocol along with national fleet and commercial support for logistics professionals. Our certified technicians prioritize your safety by following industry-leading standards for every vehicle we service.
Schedule Your Professional Windshield Replacement with Pinnacle Auto Glass Today. Your vehicle's safety technology and structural seal deserve the attention of seasoned experts. Drive with confidence knowing your new windshield is installed to last.
Frequently Asked Questions
How long after windshield replacement can I drive my car?
You should wait at least one hour before driving your car. This period is known as the Minimum Drive-Away Time (MDAT). It allows the urethane adhesive to form a primary safety bond. However, always follow the specific windshield replacement aftercare instructions provided by your technician. Some heavy-duty adhesives or environmental factors like extreme cold might require a longer wait to meet safety standards.
When is it safe to remove the yellow or blue tape from my new windshield?
Wait at least 24 hours before removing the retention tape, though 48 hours is ideal. This tape holds the glass in place while the adhesive is in its "green" or soft cure phase. Peeling it off too early can cause the glass to shift slightly. When you do remove it, pull gently at a 45-degree angle to avoid leaving residue or damaging your vehicle's paint.
Can I wash my car immediately after a windshield replacement?
No, you must avoid high-pressure car washes for at least 48 hours. The intense water jets and harsh chemicals in automatic wash tunnels can penetrate the curing seal. This leads to leaks or structural weakness. If your car needs cleaning, a gentle hand wash is acceptable after the first 24 hours. Just ensure you keep the water stream away from the new windshield perimeter.
Why do I need to leave my windows cracked open for 48 hours?
Leaving a side window cracked by an inch prevents air pressure spikes from damaging the new seal. Modern vehicles are airtight; closing a door creates a sudden burst of pressure that can "blow out" the wet adhesive. This simple step allows the air to escape safely. It's a critical part of your windshield replacement aftercare instructions to ensure the bond remains watertight and structurally sound.
What happens if it rains right after my windshield is replaced?
Light rain is generally safe after the first hour of installation. Most modern urethanes are moisture-curing, so a small amount of humidity can actually help the adhesive set. However, you should protect the car from heavy downpours or standing water during the first 24 hours. A torrential storm puts physical weight on the glass that can shift the bond before it's fully permanent.
Do I really need ADAS recalibration after getting new glass?
Yes, ADAS recalibration is a non-negotiable safety requirement for vehicles equipped with cameras or sensors. Even a tiny shift in the glass position changes the camera's field of vision. This causes safety features like Lane Keep Assist or Forward Collision Warning to malfunction. Professional recalibration ensures your safety tech is aligned perfectly with the new glass, protecting you and your passengers.
Can I use my sunshade or dashboard covers after the installation?
Avoid using interior sunshades or dashboard covers for the first 48 hours. These accessories can press against the glass from the inside, putting uneven pressure on the curing adhesive. Additionally, they can trap heat against the seal, which may cause the urethane to cure unevenly. Keep the dashboard clear to allow the bond to stabilize without any physical or thermal interference.
How do I know if my new windshield was installed incorrectly?
Listen for whistling or wind noise at highway speeds, as this indicates a gap in the seal. You should also check for water leaks after the first rain or hand wash. Visual signs include the glass sitting unevenly in the frame or gaps in the exterior molding. If you notice any of these issues, contact your service provider immediately to address the installation error.


